We’re continuing our series of raid guides WoW on how to defeat bosses in the upcoming Dragonflight raid. In Part 1, we covered the first three encounters, so this time, we’ll walk you through Assault of the Zaqali, Rashok, and Zskarn, both of which players have already tested on PTR. Let’s go!
TABLE OF CONTENTS
Assault of the Zaqali: Boss Guide
During this encounter, you will face Warlord Kagni and his allies, each with their own set of attacks. Though the boss hasn’t been tested yet, and we still don’t know when we’ll be able to do so, we have the full description of the enemies’ abilities. Thus, let’s see what they are.
Zaqali Abilities
Warlord Kagni

Devastating Leap: At full energy, Kagni leaps between the ramparts and lands, slamming a hammer that deals 93,611 Volcanic damage to everyone hit. Plus, they receive 20% additional damage for 15 seconds.
Molten Swing: Kagni’s molten mace melts a player’s defenses, inflicting Volcanic damage and increasing Physical damage for 15 seconds.
Heavy Cudgel: Boss slams hammer on the target, inflicting 312,038 Physical damage to players in front.
Desperate Immolation: Kagni drains the rest of Ignara’s power, healing and gaining Ignara’s Fury.
Demolishing Slam: Warlord aims at the door and lunges at it, dealing Physical damage to all players standing near the door.
Flaming Cudgel: Works the same as Heavy Cudgel but also marks players with a flame that inflicts 154,802 Fire damage to those who are near the target.
Zaqali Aide: Warlord Kagni summons two of his commanders to assist him in battle.
- Obsidian Guard who does Volcanic Shield
- Flamebound Huntsman who does Blazing Spear
Ignara
Ignara: Kagni’s companion that flies between the battlements providing aerial support and deals Flaring Firestorm.
Magma Mystic
Magma Mystic: Periodically lands on a battlement and begins casting Molten Havoc that causes Molten Burn, which inflicts 37,445 Volcanic damage to all players. Moreover, they cast Lava Flow and Slag Burst.
Zaqali Wallclimber
Zaqali Wallclimber: Wallclimbers scale the rampart walls in an attempt to destroy the door with a Battering Slam.
The Best Strategy for Assault of the Zaqali
Since there has been no testing of this encounter yet, we don’t have a strategy for this specific fight to share with you. But once we do, we’ll update this guide; stay tuned!
Rashok, the Elder: Heroic Boss Guide
Next on your way is Rashok, whom players tested on March 17. This boss possesses numerous powerful abilities, which will certainly give you a hard time. See for yourself!
When it comes to battle, one of the best tactics is to know your enemy and what they have at their disposal, right? So let’s find out what this boss’s mechanics are!
Rashok Abilities
Ancient Fury: When Rashok reaches 100 energy, he deals 312,038 Shadowflame damage to all players every 3 seconds.
Molten Blood: Up to three random Lava Vortexes spawn that explode with Raving Lava.
Searing Slam: Rashok draws power from all Lava Vortexes, targets a player and inflicts 62,408 Fire damage to everyone by jumping to the target. The hit creates Lava Vortex, which causes Fiery Outburst when hit with Searing Slam. The boss can increase the abilitie’s damage with Blazing Infusion.
Doom Flame: Rashok creates circles across the room, inflicting 93,611 Shadowflame damage to all players within 5 yards. If it’s not soaked, it inflicts massive Shadowflame damage to everyone.

Shadowlava Blast: Boss creates a frontal Shadowlava attack that inflicts 1,040,744 Shadowflame damage.
Charged Smash: Rashok smashes the ground, dealing 1,872,227 Shadowflame damage divided among all players.
Volcanic Combo: A targeted player receives a mix of Earthen Crush and Flaming Upsurge attacks.
Siphon Energy: When Rashok’s energy is being drained by the conduit, it causes several attacks, such as Scorching Heatwave and Scorched Flesh.
Unyielding Rage: After being drained of energy, boss deals 15,602 Shadowflame damage to all players.
The Best Strategy for Rashok, the Elder
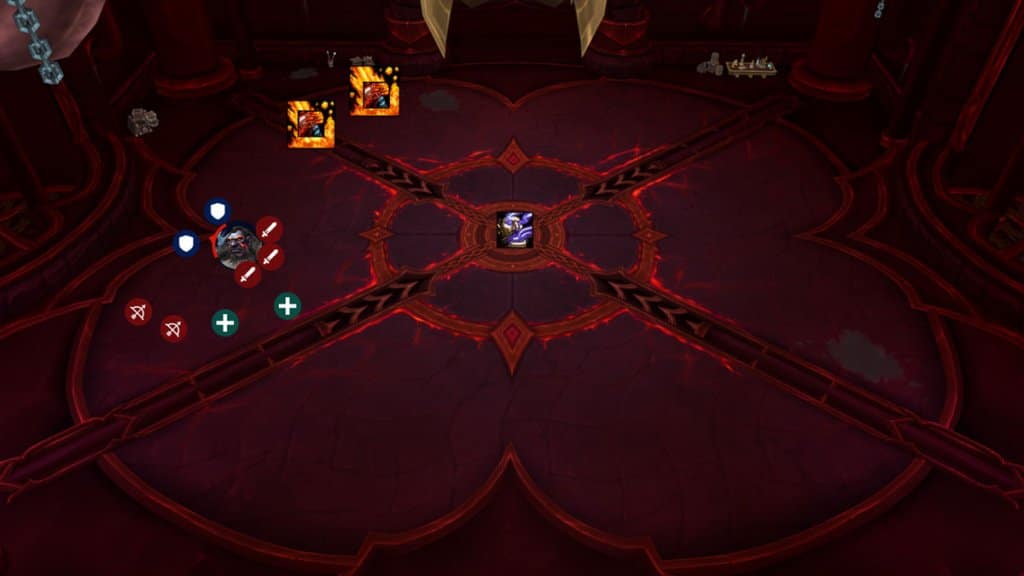
Setup: 2 Tanks, 4-5 Healers, 13+ DPS
First of all, try to pull Rashok to the side and make him face the wall. Then, those players who are targeted by Searing Slam, should take it to the corner of the room, away from the group. There, they need to place every Searing Slam that comes next near the previous one in a counterclockwise/clockwise direction. Moreover, because of the risk of triggering Fiery Outburst and causing a wipe, they should also avoid striking other Lava pools with this ability.
It’s important for everyone to choose a position that will allow them to see the boss and Raving Lava pools. That way, you all will be aware of moving puddles and incoming attacks.
All Doom Flame circles need to be soaked, as well, as Charged Smash should be soaked by almost everyone to reduce damage. On top of that, beware that with two DoTs active, Searing Slam’s damage will quickly escalate.
Then, try to bait Shadowlava Blast towards a wall or dodge it by being close to the boss or with speed boosts. After that, while placing with the last Searing Slam and dodging lava puddles, move Rashok close to the area’s center. Before he reaches 100 energy (for instance, while he has 90 energy), bring him to the center. That way, the boss will trigger Siphon Energy intermission.
During this period, group up and dodge the Shadowlines until Rashok’s energy hits 0. Once it happens, you’ll be knocked away and take a little damage as well as debuff stops you from draining for a set period of time.
Do the whole thing again, but this time, be aware of more lava puddles and Searing Slam that you need to dodge.
The Vigilant Steward, Zskarn: Heroic Boss Guide
The sixth boss you’re going to meet in Neltharion’s laboratory is Zskarn. The players have already fought him during March 17 testing and shared how it went.
Thanks to the testing, we now know the boss’s abilities as well as the best tactic for defeating him. Let’s start with the former.
Zskarn’s Abilities
Dragonfire Traps: Zskarn activates Dragonfire Traps next to him that applies DoT inflicting 46,806 Fire damage every 1 second for 6 seconds to all players standing near.
Animate Golems: Dragonfire Golems spawn to Activate Dragonfire Trap and drop Salvage Parts upon dying, which you must use to Deactivate Dragonfire Trap.
Tactical Destruction: After Zskarn reaches 100 energy, the Dragon statues begin to erupt, inflicting 780,095 Fire damage to all players who got caught.
Shrapnel Bomb: Boss creates three bombs that deal Physical damage and inflict additional one every 1 second for 10 seconds to the group.
Unstable Embers: Zskarn marks several players with it which makes them inflict 37,445 Fire damage to others every 1 second for 10 seconds.
Blast Wave: Ability knocks all players back, inflicting Fire damage and an additional for 9 seconds.
Searing Claws: Boss applies DoT to the target dealing Fire damage every 2 seconds for 20 seconds.
The Best Strategy for The Vigilant Steward, Zskarn
Setup: 2 Tanks, 4-5 Healers, 13+ DPS
Opening
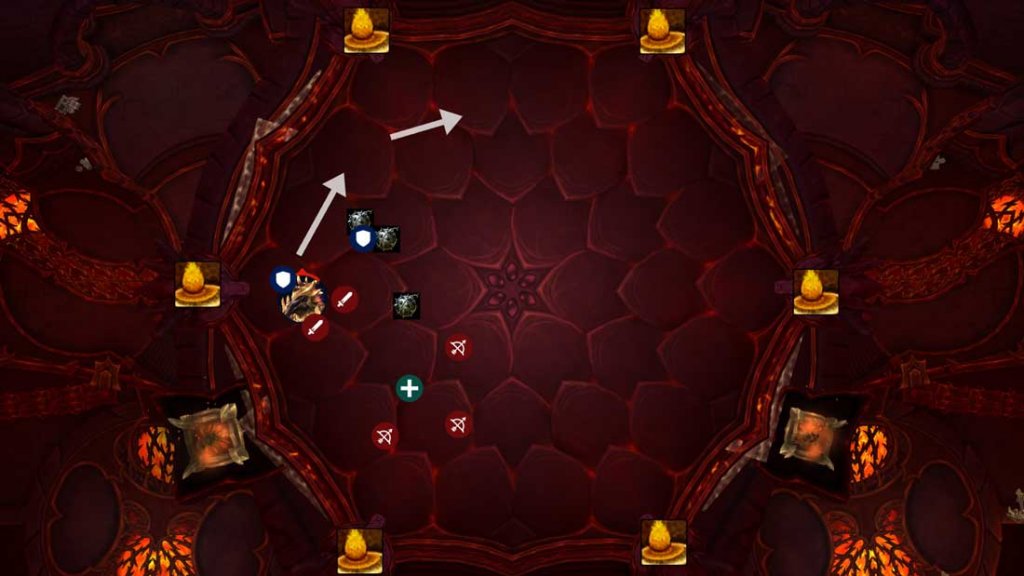
Besides Zskarn, you’ll also face the adds and deal with traps. So, the first step is to have the tank drag the boss to the side of the room and position him near one of the Dragon Statues. They must stay there until the first traps activate. Then you should move clockwise, keeping Zskarn near the activated traps.
The off-tank should focus on soaking Shrapnel Bombs. If necessary and towards the end of the encounter, when space is filled with active traps, you can call players with immunities to soak these bombs instead. It will help avoid taking significant damage when running through traps.
Players targeted by Unstable Embers must move away from the rest of the group. However, it’s better if everyone is spread out during the fight, as the ability will be used a lot.
When Golems spawn, you must focus all your attention on them, bringing them close to Zskarn to increase cleave damage and eliminate them. Also, don’t let them do their casts. When you deal with Golems, the pre-assigned members of the group should quickly collect the tools that adds dropped and use them for trap deactivation. Because the knockback impact tends to draw players into the center of the room, traps placed near there should be given special attention.
Traps Clearing
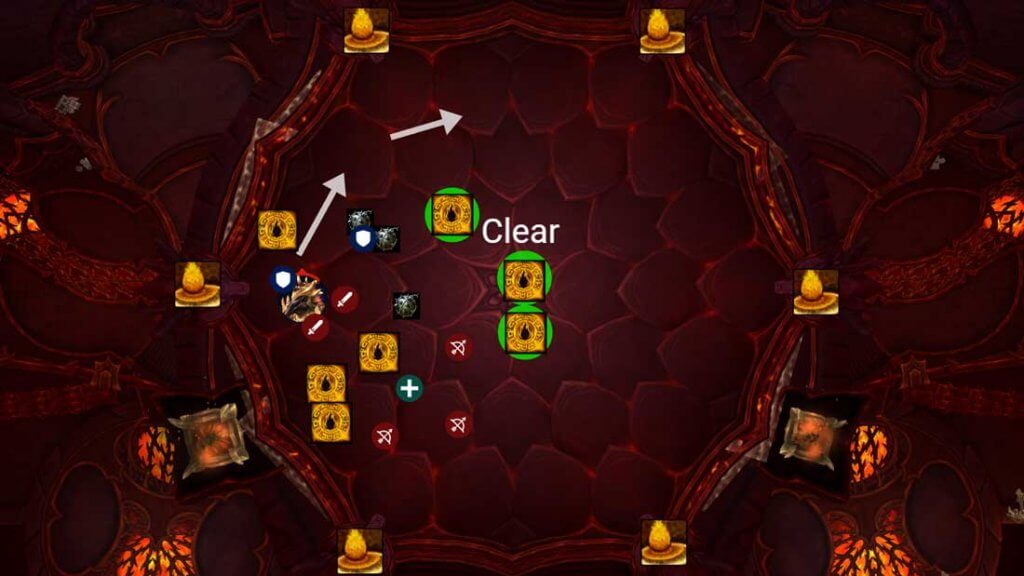
For the Blast Wave, make sure you all have a good position that will help you avoid getting pushed into a trap or to the active Dragon Statue. Moreover, healers have to be ready for the DOTs and extra damage the group will take and pay special attention to those who got into a trap as they have 2 ticking DOTs.
When Zskarn reaches 100 energy, he will activate a few Dragon Statues, meaning that you need to run to a safe spot when it happens ASAP. Throughout the entire encounter, the number and the range of statues will increase. Also note that during the testing, the ability’s range was larger than the spell animation, so it won’t hurt to run 15 yards further from a spot you think you are safe at.
Though there are no phases, the encounter will become more difficult as more traps spawn, giving you a hard time dodging attacks. But as long as you don’t let Golems Activate Dragonfire Trap by eliminating them and use all three tools they drop to deactivate traps, you should be able to defeat Zskarn and finish this fight successfully.
Final Words
That would be all for this WoW Dragonflight raid guide; thank you for reading! We’ll definitely update it once we have more info about the Zaqali encounter. Moreover, there’s the third part coming soon, where we’ll take a closer look at Magmorax and Echo of Neltharion boss fights and Scalecommander Sarkareth’s abilities.
By the way, if you’re looking for the easiest way to conquer these bosses, LFCarry is at your service. We’ve been helping players achieve their in-game goals for over seven years and always find new ways to improve their game. One of our customers, Oliver, has experienced it firsthand. He started playing the game when the Dragonflight expansion just came out. So when the Vault of the Incarnates raid had been released, Oliver didn’t feel confident enough to run it with random players.
So, instead of giving up, he turned to us and hired our PRO players, who joined him for the raid. Together they beat all boss encounters quickly, and Oliver got a chance to learn from the game’s veterans. Now, he’s using this experience in his game and can’t wait to enter the newest raid with our experts in May.
As you can see, with the help of our professional players, you have the best chance at successfully defeating the Aberrus, the Shadowed Crucible bosses. Don’t risk failure and frustration in these challenging encounters. Let our PROs guide you through each fight with ease!
Read also:
Polly Gruse is a seasoned gamer with extensive experience in the Call of Duty series, as well as deep expertise in Destiny 2 and World of Warcraft, allowing her to craft detailed guides and insightful analyses that help players refine their skills, master game mechanics, and stay ahead of the competition.
